Wildlife Silhouettes and the Power of Shape
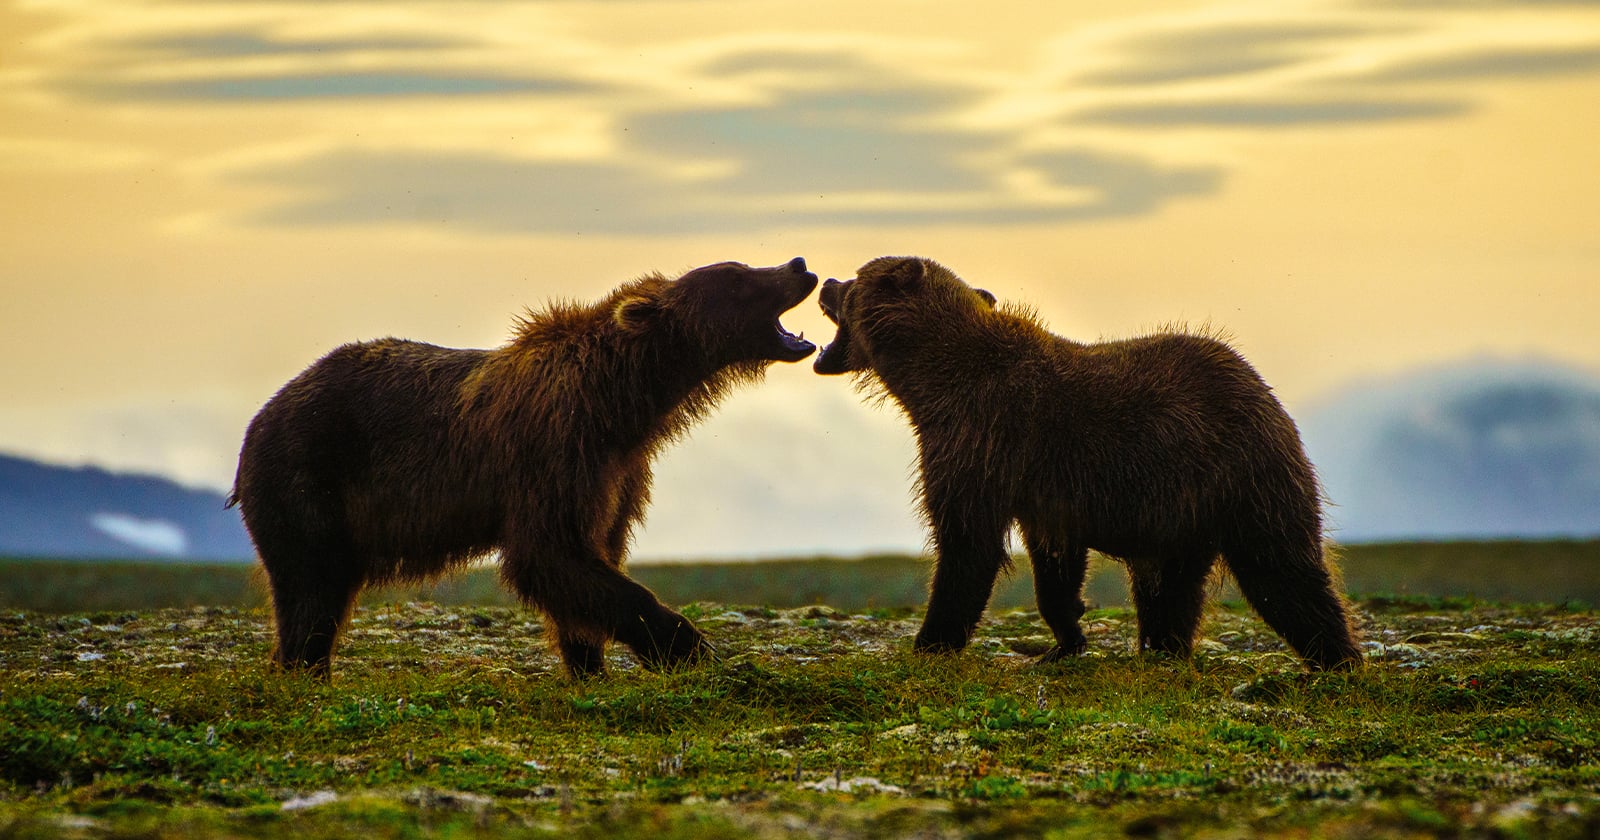
Explore how posture, shape, light, and composition can help wildlife photographers create striking backlit imagery that tells a powerful story.
Wildlife photography often emphasizes detail. Photographers work to capture the texture of feathers, patterns in an animal’s coat, expressions in its eyes, and the small features that reveal its character. Silhouette photography takes a different approach. Instead of relying on those details, it reduces an animal to its outline, using shape, posture, and positioning to communicate the subject. The result is a more graphic, interpretive image that asks viewers to recognize the animal through its form rather than its appearance.
Creating compelling wildlife silhouettes involves more than placing an animal in front of a bright sunset. The subject needs a recognizable outline, its posture should contribute to the image, and the background must provide enough contrast to make its shape clear. Composition and timing also matter more because small changes in an animal’s position can dramatically alter the photograph. Understanding these elements helps photographers recognize opportunities where removing detail can make a wildlife image more expressive.
A successful silhouette depends on how easily the viewer can identify the subject and interpret its position. Without visible detail, the outline becomes the primary source of information. Body proportions, head position, and distinctive anatomical features all contribute to whether an animal remains recognizable. A silhouette that communicates its subject immediately is generally more effective than one that leaves the viewer guessing.
Some animals and poses naturally lend themselves to this approach. An elk with clearly defined antlers, a fox with its ears raised, or a bird with its wings extended has a distinctive outline that remains identifiable even when rendered entirely dark. By contrast, an animal facing directly toward the camera may lose much of its recognizable shape. Its body can appear compressed, and important features may overlap.
A strong silhouette should also contribute something to the photograph beyond simply creating a dark subject. It might emphasize an animal’s scale against a large landscape, highlight a particular behavior, or simplify an otherwise busy scene. The most effective images use the silhouette as a deliberate storytelling choice rather than treating it as an exposure effect.
For my approach to wildlife silhouettes, I also consider backlit photographs part of the same creative technique. A silhouette does not always have to be a completely black, cookie-cutter shape against a bright background. While I enjoy the graphic impact of a strong, dark outline, I also like to lift the shadows slightly, either in the field with my exposure settings or in post-processing, to reveal some of the subject’s texture while retaining the effect of the backlight. This can bring out details in fur, feathers, or other surface features, letting the light contribute to the image differently. The result still emphasizes shape and the relationship between the subject and the light, but offers a little more visual information than a fully black silhouette.
Before photographing an animal as a silhouette, consider which anatomical features make it recognizable. Different species have distinctive profiles, and understanding those features can help you anticipate the most effective shooting angle. For mammals, this might be the shape of the head, the length of the legs, the position of the ears, or features such as antlers and horns. For birds, the bill, neck, tail, and wing shape often provide the most important identifying characteristics.
The angle of the animal can change how these features appear. A broadside position often provides a recognizable profile because the body, head, and legs appear as separate shapes. A three-quarter angle can add depth, particularly when the animal turns its head toward the camera. Front-facing positions can also work, but they often rely on distinctive features to keep the outline from looking indistinct.
Birds offer a wide range of possibilities because their silhouettes change so dramatically with wing position. A bird in flight with its wings fully extended has a very different outline from one gliding with its wings angled downward. The shape of the wings can also help identify a species, with long, narrow wings, broad rounded wings, and separated flight feathers each creating different visual patterns.
Studying animal profiles and observing wildlife in the field can help you recognize these opportunities. Instead of focusing only on whether an animal is facing the right direction, look for positions that reveal its defining characteristics. A slight turn of the head or a change in ear position can be enough to transform an ordinary outline into a recognizable portrait.
When fine detail disappears, posture becomes one of the most important ways to communicate an animal’s character. A standing animal with its head lowered may create a relatively unremarkable shape, while the same animal raising its head, stretching, or interacting with another individual can produce a much more expressive image. The silhouette should ideally show something about the animal, not just document its presence.
Behavior can provide some of the most interesting opportunities. An elk bugling with its head raised, a bear standing on its hind legs, or a bird extending its wings during a display all create recognizable gestures. Even smaller movements can work well. A fox listening with its ears pointed forward, or a heron poised with its neck extended, can create a distinctive profile without requiring dramatic action.
Anticipating these moments is often more effective than reacting after they happen. Wildlife photographers already spend considerable time learning animal behavior to predict where subjects will move and when interesting activity might occur. The same preparation applies to silhouettes. If you know a bird is likely to take flight from a particular perch, or that an animal regularly pauses on an exposed ridge, you can prepare for the moment rather than scrambling to adjust your position after it begins.
Continuous shooting can help when the opportunity involves movement, but a burst of frames does not guarantee the strongest composition. Watch for the positions that communicate the behavior most clearly. For a bird in flight, that might mean waiting for the wings to reach full extension. For a mammal, it could be a moment when its head and limbs create a particularly expressive gesture. The goal is to capture the most meaningful position, not simply the most frames.
The simplicity of a silhouette makes compositional decisions especially noticeable. With fewer details competing for attention, the animal’s placement, direction, and relationship with the surrounding space carry much of the photograph’s visual weight.
Consider the direction in which the animal is looking or moving. Leaving open space in front of a subject can create a sense of movement and give the viewer somewhere to follow its gaze. A bird flying toward the open side of the frame, for example, generally feels less confined than one positioned directly against the edge. Similarly, an animal looking toward an open horizon can create a sense of anticipation or connection with the landscape.
The animal’s size within the frame also changes the story. A relatively large silhouette emphasizes anatomy and posture, making it easier to appreciate the subject’s shape. A smaller animal surrounded by open sky or landscape can communicate scale, distance, and isolation. This wider approach can be particularly effective when the environment is an important part of the photograph.
Natural lines can provide useful compositional structure. A ridgeline, shoreline, or distant tree line can anchor an animal within the scene and create a visual connection between the subject and its surroundings. Experiment with both tight and wide compositions when the situation allows. A tighter frame emphasizes the animal, while a wider image can reveal more about its place in the landscape.
Silhouette photography depends on contrast between the subject and its surroundings. Sunrise and sunset provide familiar opportunities because the sky is often much brighter than the landscape. Positioning an animal against a bright section of sky can create a dark outline while retaining the colors and tonal transitions of the surrounding light.
The sun does not necessarily need to be visible in the frame. A colorful band of light near the horizon, a bright opening between clouds, or a softly illuminated sky can all provide an effective background. Other lighting conditions can work as well. Bright overcast skies, open water, reflections, and distant illuminated areas of landscape may provide enough contrast to isolate an animal.
Think about the background as an active part of the composition rather than simply a source of brightness. A relatively uniform sky often works well because it allows the animal’s shape to stand out. More complex backgrounds can introduce atmosphere and context, but they may compete with the subject if they contain too many contrasting elements.
Light quality and direction change as the sun rises or sets, so the best background may be available only briefly. Identify promising positions before the animal reaches them, and watch how the light changes across the scene. A slight shift in the animal’s position or the sky’s color can produce a noticeably different result.
Even a distinctive animal can become difficult to identify when its outline merges with the surrounding environment. Branches, grasses, rocks, and other animals can obscure important features, particularly the legs, ears, antlers, and wings. Because a silhouette removes most internal detail, these overlaps matter more than they would in a conventional wildlife portrait.
Before taking the photograph, scan the entire outline. Check whether the animal’s legs are distinguishable, whether its head and ears are clearly defined, and whether important features are lost against nearby objects. With birds, pay particular attention to the wings and tail. A bird with its wings tucked tightly against its body may appear as a much simpler shape than one with its feathers spread.
Changing your position is often the easiest way to improve separation. Moving a short distance to one side can shift a branch out of the animal’s outline or create a gap between its legs. A lower shooting position may place the subject against the sky rather than vegetation, while a higher position can sometimes remove distracting foreground elements. These adjustments are especially useful in wetlands, grasslands, and wooded environments.
Multiple animals introduce another challenge. When individuals overlap, their silhouettes can merge into a single shape that is difficult to interpret. This does not mean you should always avoid groups. A group of birds in flight can create a compelling pattern, and animals gathered together may communicate social behavior. The important distinction is whether the arrangement remains visually understandable. Waiting for individuals to separate or for their positions to change can make the difference between a confusing cluster and a deliberate composition.
Exposing for a silhouette requires a different approach from a traditional wildlife portrait. Rather than preserving detail in the animal’s shadows, the goal is to retain important background information while letting the subject fall into darkness. This means exposing for the brighter surroundings instead of trying to balance the entire scene.
Automatic exposure modes can sometimes make this difficult. When a camera detects a large dark subject against a bright background, its metering system may attempt to brighten the scene. The result can be an animal with visible shadow detail instead of a solid silhouette. Exposure compensation provides a straightforward way to address this. Reducing exposure can keep the subject dark while preserving the sky’s colors and tonal information.
Manual exposure offers more control, particularly when the background brightness remains relatively consistent while the animal moves through the frame. You can establish an exposure based on the sky and maintain those settings rather than allowing the camera to continually adjust for changes in the composition. Spot or center-weighted metering can also help, depending on where you place the metering area and how your camera interprets the scene.
The histogram helps you evaluate exposure, especially when photographing colorful skies. Overexposing the brightest areas can remove the subtle color transitions that make the background interesting. Review the histogram and highlight warnings to determine whether you are retaining the tones you want. At the same time, don’t worry about preserving shadow detail in the animal if you intend to create a true silhouette.
Shutter speed remains important because wildlife behavior doesn’t become less unpredictable just because the subject is dark. A bird taking flight still needs a fast enough shutter speed to preserve the shape of its wings, and a running mammal may require a similarly fast exposure to prevent motion blur. If the animal is stationary, you may have more flexibility, but it is still worth accounting for small movements such as turning its head or shifting its weight.
Autofocus can become more challenging when the subject is dark against a bright background. Depending on the camera and scene, the autofocus system may have fewer visible details to identify. Tracking modes and subject detection can still help, but watch how reliably the camera follows the animal. In some situations, focusing on the subject before it moves into the brightest part of the background may be more effective. Continuous autofocus and burst shooting can help with unpredictable movement, but they work best when paired with an understanding of the animal’s likely path.
Although the animal itself is often rendered as a dark shape, the background can bring considerable color and atmosphere to a silhouette photograph. Sunrise and sunset provide familiar warm tones, but cooler twilight colors can work just as well. Deep blues, soft purples, and muted pastels can create a quieter mood, while reflections and layers of color can add depth without distracting from the subject.
Negative space gives the animal room to stand apart and allows the viewer to focus on its shape. This works especially well when photographing a small animal against a large sky or open landscape. The surrounding space becomes part of the story, communicating scale and emphasizing how the subject fits into its environment.
Minimalist compositions often work well because they reduce competing elements. A single bird against a colorful sky, an elk standing on a distant ridge, or a fox crossing an open field can create a strong image with very little visual information. However, minimalism does not mean every photograph needs only one subject. A small number of carefully arranged elements can create balance, rhythm, or visual contrast.
Reflections offer another way to add visual interest while keeping the composition simple. A bird standing in shallow water may produce a second shape beneath its body, creating symmetry or a repeating pattern. A calm lake can also provide a contrasting surface, depending on the direction of the light. These compositions can be particularly effective when the reflection remains recognizable and adds something to the overall arrangement.
Another way to use minimalism is to move in closer and create a tighter portrait, emphasizing the animal’s outline and the details that define its shape. At this distance, subtle textures and contours become more prominent, adding visual interest while keeping the composition simple. This is another time when I play with my exposure to decide if I want a flat silhouette or one with more information in the darkened areas.
Silhouettes, or backlit images, aren’t always the best approach for every wildlife encounter. Many situations require an animal’s coloration, markings, expression, or visible behavior to tell the story. A close portrait that reveals the texture of fur or the details of a bird’s plumage may communicate far more than a dark outline. Deciding whether to photograph a subject as a silhouette should come down to what the image is meant to convey.
When shape or gesture is the most interesting part of the scene, removing detail can strengthen the photograph. A bird spreading its wings against a sunset, an elk calling from a ridgeline, or a mammal looking toward an open horizon can communicate its presence through posture alone. The viewer does not need to see every detail to understand the moment. Instead, the simplified form encourages them to focus on the animal’s movement and relationship with the environment.
Most of all, silhouettes can add variety to a wildlife portfolio. Photographers naturally spend considerable time pursuing sharp, detailed images, particularly when working with long telephoto lenses and tracking fast-moving subjects. A silhouette offers a different visual approach, emphasizing composition and light over revealing every feature. It can help tell a broader story about an encounter or location, especially when paired with more traditional wildlife portraits.
When conditions allow, photograph a scene both ways. A traditional exposure may reveal the animal’s markings and expression, while a silhouette may create a more graphic, atmospheric interpretation of the same moment. Comparing the two approaches can help you decide which communicates the scene most effectively.
Ultimately, wildlife silhouette photography is about recognizing the visual strength of an animal’s shape. Distinctive anatomy, expressive posture, thoughtful composition, and suitable light all contribute to an image that remains compelling without the details normally associated with wildlife photography. Sometimes, revealing less about an animal allows its shape, movement, and place in the landscape to tell a more compelling story.
Image creditsPhotographs by Kate Garibaldi